Into 2024

I have started a full campaign to test the full set of Fight Your Own Wars rules - its the first time that ALL of the rules have been used for one campaign!

Left: This is the "map" as drawn for the table in question and Right, this is the table laid out.

Note the main road on the left and the secondary road on the right.  Secondary roads count as "roads" for the purpose of FYOW but they can be affected by bad weather whereas a proper (metalled) road does not until the rain gets really bad.


This picture shows the view that the German defenders had of the road as it wound towards them.  A British Recce unit was expected.  The old barn in the foreground held the defenders CP whilst an SdKfz 232 hid in the trees to the right.  Beyond those trees, on the higher ground, a German platoon would be the first to engage any British force approaching, but in the game, they were badly mauled by small arms and mortar fire.

Details of the campaign and this battle will appear shortly on the YouTube channel.

Just when I thought I had covered all of the bases, I realised that I needed a rule for repairing damaged AFVs after an engagement.  Engineers Field Park units do this.  A rule was prepared and will be tested "on the hoof" as the campaign runs through.

New hill system

The new hills are complete and have been used in a game for the first time.

Below left - the hills are capable of supporting terrain pieces to elevate woods etc.  Below right - layers can be built up to give 2 or 3 levels.

Below left - this view across the board from a low level shows how buildings can be placed to dominate the surrounding area.  Below right - lines of sight are affected by the hill pieces

Below - although this German mortar team are on the baseboard, the hill in the background adds a real sense of "scenery" to the appearance of the games.  Previously, boards were flat or used lumps of polystyrene that looked like lumps of polystyrene!!

New modular hill system

After years of planning a modular hill system (and doing nothing about it!!), I have finally bitten the bullet and made a start.  The bases are 6 inch x 6 inch 33mm MDF squares with 1 inch sides cut and shaped on the bandsaw.  The slopes comprise 3 inches of flat terrain and 3 inches of slope, all carefully cut to ensure that they line up with each other.  It will not surprise you to learn that the size has been chosen to fit with my modular scenic baseboards!

The basic geometry can be seen here.  There are about a dozen different shapes and configurations for slopes, solids and corners.  Also evident are the "reducer" sections - reducing the width from 6 inches to 3 inches.  These avoid the whole thing looking too square.  The right hand picture shows how the levels can be built up by setting another group of modules on top of the flat surfaces of the first layer.

Going forward, these "trays" will be filled with polystyrene (I have a load of 1 inch sheets, hence the chosen depth) and shaped before being covered with filler and flocked.  They will be plain as any terrain required can simply be placed on top along with walls, trees and buildings.  The fronts of the slopes will be shaped, again to avoid the whole thing looking square.

Not shown here are the modules set aside for special treatment - a couple of 6 inch x 6 inch sloped modules which will carry the road up a level and some "solid" 6 inch x 6 inch modules to allow the road to continue.  There may also be a couple of modules that allow the road to cross the river at "level 1" as opposed to "ground level".

In the design stages are about 12 modules that make up a set of cliff faces, 3 levels high and sloping down to level 1.  These will work with the "beach" boards to simulate a rugged coastline.  These modules will be made 3 or 2 levels high (using tall sides) but will retain the same basic design qualities as the basic modules.  In this way, they can be integrated into a table set-up and extended across the board as required.

I will post more pictures as the project develops but, in the meantime, there are some example and movie footage on the Fight Your Own Battles YouTube channel as part of the "Heroes All" video series [#9].

New gaming table

Above left  The bedroom I am now using for my wargames activities.  It has to double as a bedroom so whatever I do, I cannot take up too much space!  Many may consider this less than perfect but, in reality, it's better than the old dusty, noisy loft space I had in the previous house.

Above right  Storage space under the "Ottoman" style bed provides a home for the new table set-up and the scenery boards.  There should also be enough space for the modular hill squares when they are finished - but that's another story!!  The table is in kit form, made from 2"x2" timber with fold-down legs and cross braces to support the 3mm ply sheets seen on the left.  The sides and ends are held together by "Modesty Blocks" - plastic connectors that are screwed to each piece and held together by a screw.  The cross braces are just held in by dowels so 4 screws are all that is required.  Latched hinges allow the legs to be folded up when being stored.

Above left  The table takes about 15 minutes to put together and sits easily over the bed giving access to three sides.  The total area is 6ft x 4ft and stands 3ft high, allowing me to easily reach all parts.  The scenery boards have been shown before and are laid out here to demonstrate how they fit together.

Above right  A view looking the other way with the beach landing boards in use.  If needs be, there are sufficient boards to allow the beach to run the length of the table as an alternative.  Note the various road junctions allowing millions of options for gaming.  I have about 50 of these double-sided boards offering road, river and blank options.

Above left  If I want to play river-crossing scenarios, I have a number of "big river" boards - note the river crossing option, designed to fit the Airfix/Dapol girder bridge that appeared earlier on the site.  Careful study of this picture will show the way that the geometry of the boards allows them to fit together in a variety of ways.

Above right  The same road configuration but using the smaller river boards.  The road/river crossing can be the site of a ford or a bridge.  River boards can also be provided offering a jetty feature, or the confluence (meeting) of two rivers.

There is a video going to land on the YouTube channel shortly which talks further about this set-up, its advantages and draw-backs etc.  I will also be discussing the upcoming "Project Hill".

New Models for a new venue

A few pictures of models made during the house move that may not have featured on the website.

The setting is a single scenery board with a few of the new trees.  They are in need of weight in the base to stop them falling over easily!!

First up, a troop of Matilda I Infantry tanks that will form part of the British Armoured Regiment for 1940.  They sport the 0.303 Vickers MG but could also be used to depict the 0.5 version - the guns look very similar in this scale.

British Cruiser tanks.  An A10 leads an A13 over the same bridge.  The Cruiser Mk II (A10) was originally to be an Infantry tank but proved unsuitable so became a "Heavy Cruiser".  It was slow and mounted the QF 2-pounder (40mm) gun.  Like most British cruisers, the A13 was fast ("Christie" suspension) but under-armoured (same QF 2-pdr) and mechanically unreliable.  Most were lost during the intial stages of the Battle of France.

Two British soldiers pass an abandoned Italian CV-35.  The L3/35 (or CV-35 as it was known) was built very cheaply and it showed!  An upgrade on the CV-33, the 6.5mm MG was replaced by twin 8mm guns but the armour was paper thin and although it fought everywhere the Italians went, it was a very poor performer against anything resembling a half-decent AT round.

Italian M14/41 tanks.  Another poor Italian machine.  Sporting a 47mm gun and thin armour, it was obsolete on introduction in 1941.  Most were lost in the desert campaign and although captured examples were used by the allies when they were desperate, they were quickly dropped.  The chassis became the basis for the Semovente 90/53 SPG.

Another Italian vehicle that was obsolete when introduced, the Semovente L40 47/32 was a "tank destroyer" built on the L6/40 light tank chassis.  The 47mm gun was really underpowered when used on the Eastern Front although the Germans took them over when Italy fell out of the war.

All of the wepaons shown here are resin 3D prints or castings from various sources and have been purchased as part of the build up to my early-war campaigns.

The new terrain

As mentioned on the NEWS page, I have recently bought these resin bits from aha21 on eBay.

Created in grey neutral resin they offer wall sections and rubble piles - not the easiest thing to make yourself, hence my purchase.  First impressions are good.  Care - when working with resin, wear a mask and beware of the dust - its nasty stuff!!  17mm high, they are good for 20mm and 15mm tables.  I might mount them on a card base which I can flock but will paint them first - they might be more flexible if they can be out anywhere on the table without a base.

I have also taken the plunge and ordered some 6mm MDF hexagon shapes to experiment with new baseboards.  They are only 240mm across so can be easily stored.  I am looking to produce some baseboards (that are not predominantly "green") for Western Desert, Sicily, Italy etc.  They will be made double-sided as are my existing boards and I can add tracks and roads.  Few or no river sections are envisaged!  Watch this space for developments.


These pictures all appeared in the Heroes All book but illustrate the latest developments at FYOB HQ.  Top left shows a Crusader AA passing one of the new rocky outcrops and some of the horsehair hedging.  These recent terrain developments have really improved the look of the battlefield which is now just 6ft x 4ft in line with my wishes for fighting HA games.  Top right shows a Stuart "Honey" repainted from desert livery and, as yet, unmarked.  More rocky outcrops and hedges on show.  The Stuarts were used in a Recce role later in the war and I am more likely to use them in this role rather than in any desert scenario.  I might look to use HA in the Western Desert if I run out of other things to do!  Bottom left shows the enemy this time lurking under a tree that has been added to a foamboard base and painted.  Note the older style of tree basing in the background and see how much better the newer versions look.  The little sapling came in the same packet of trees - they are a bit cheap and nasty but I got a lot of them for virtually nothing from a Chinese source an eBay - a bit of work and they look OK.  This view also shows the new river boards - I have added about 6 of these to allow rivers to flow either the length or width of the game boards.  I have also added a few bridges including one from a shop selling stuff for fish tanks!!  Bottom right shows the Heroes All Codex cards in their plastic wallets.  They give you a quick and easy guide to data for weapons and vehicles as well as some of the more frequently-used reference tables.


New pictures for the Heroes All games 2019

A new set of rules and some new pictures for the launch.  Enjoy!


Top left - Grille 150mm SPG, top right - Radio exchange vehicle, centre left - Humber Light Recce car, centre right - L40 47/32 SPG, bottom left - Panzer III H, bottom right - SdKfz 7 with Quad 20mm Flak.  (I will add manufacturers etc when I can work them out!!!

Operation Omega

Operation Omega is an attempt to complete everything outstanding (model-wise) scattered across the wargames workbench.  I have had the Horsa glider on the right for some time but wanted a second to be able to stage a really good raid game - Pegasus Bridge is the obvious one but there are others.  I picked up a second kit at the Duckworth Air Show a couple of years back and have only now completed it.  On the right, you can see that the aircraft is fully crewed.  In the other cockpit, the co-pilot is reading a map!!

I have a Churchill tank with a spigot mortar to complete and then will move onto the German Gunboat (see earlier posts).  I might then treat myself to some of the new Plastic Soldier Company Sexton SPG's but am resisting starting anything else until Operation Omega is complete.

On The Table

Above left - the new pieces placed on a couple of terrain boards to show their effect.  Above right - I have called this "Mel's Mound" because it was the first real piece of scenery built using his techniques.  The base is card and the lumps of rock are from the same collection of old wall plaster cast-offs.


Above left - I bought the sides of this bridge at a wargames show yonks ago just to see what laser cut stuff was like.  The base of this new bridge is just coffeeshop stirrers with a couple more laid crossways underneath for support.  The whole thing is just PVA glued together and painted with acrylics.  Nothing looks more like a wooden bridge deck than wood!  Above right - Sometimes its good to see where you have been and what progress you make.  On the left is a new terrain piece made on a 2mm MDF laser cut base (from The Laser Model Store, Carnforth, Lancs) and on the right, an old effort from a few years ago - card base (warped), a stone out of the garden and two pieces of lichen over a piece of grass-mat.  The boys at The Laser Model Store will cut anything/any shape (subject to price of course) so a few odd shaped terrain pieces to replace this old stuff is going to be good.  I feel another order coming on.....

Mel The Terrain Tutor would be proud!

Having acquired some 60mm MDF bases (2mm thick) and followed the Back To Basics videos from The Terrain Tutor (Mel's a good bloke!) , here is the result.  The rocks started life as bits of old wall plaster bashed out of a job whilst the base is covered with Mel's usual paint/PVA mix.  Flock and clump foliage make up the rest.  A simple job - the 6 bases took about an hour with a couple of overnight drying sessions.  The trees are e-Bay cheapies from overseas covered in flock.  Ideal ground cover pieces for troops to hide in and to represent "broken ground". 

Recce Troop Ambush!

Here are some pictures of the recent Ambush scenario played out to get myself back into gaming.

Here is the board - just 4ft x 3ft.  The US Recce Troop arrive from the bottom and need to investigate the route North, top centre (or center I guess!).  Note the rules, cards, counters and assorted 'stuff' need to play the game on the right!!

This troop packs an M8 Greyhound, Jeep with HMG (I had to use an Airborne one because I didn't have another one painted), another jeep carrying the CO and 6 men armed with a Bazooka and a light mortar.  It sounds a lot but there were too few infantrymen and the game bogged down into a slug-fest.  I used Rapid Fire rules which are not really suited to small elements.  This small number of figures makes the CSW's appear dominant.  M8 from Ready To Roll, airborne jeep from same source & jeep/tilt from Matchbox (I think).  The new tree bases in the background look good - they were made during the unusually warm UK summer (about 30 degrees every day - yes really!!)

The enemy - an 8-man infantry company from Valiant with the addition of a Panzerfaust, 2-man PanzerSchrecke team and a 3-man MMG team.  Despite all this fire-power, when the PanzerSchrecke team were rumbled and taken out by the M8, the remaining infantry had nothing to combat the armour and just ran out of bodies before they could do serious damage to the US infantry.  Note the "concealed element" card behind them - this was one of 3 places the PanzerSchrecke team could have been hiding.  This is the last hurrah! for the old hill lumps - my next job is to make some terraced ones that figures can stand on.


German Armed Trawler project

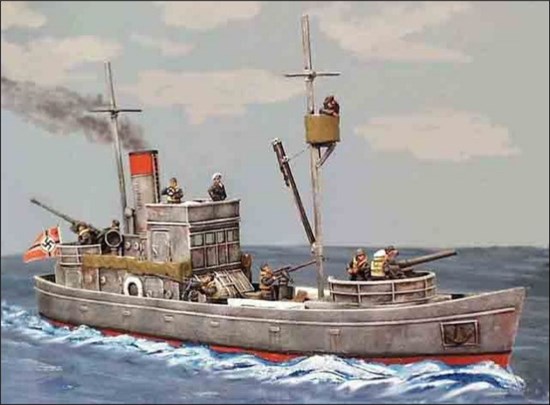
This picture, taken from the Britannia Miniatures website, shows the German Armed trawler model (AMP13) that proved too tempting at the "Colours" show last year.  For silly money (£35 I recall), you get the resin hull and superstructure, all the crew, guns, masts, everything to make what you see here.  The model sits on a base that is about 15mm bigger than the hull and is formed into waves so it's easy to paint to fit into your scenery boards.  I guess, with a bit of surgery and a steady hand, you could remove the base and create the option of having the vessel in harbour.

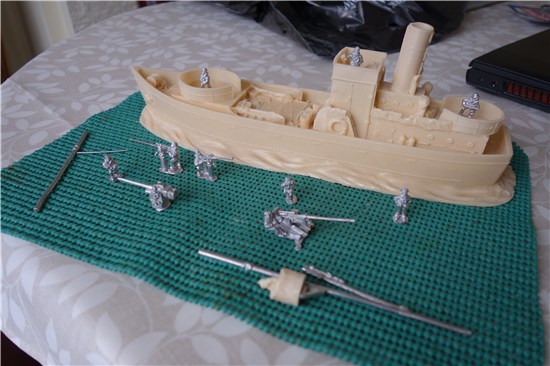
Getting home from the show, I put this away and only came back to it some 15 months later.  This is what the bubble wrap revealed - a resin cast hull with the superstructure piece (comprising the cabin, funnel and rear gun deck) as a separate piece.  The masts are white-metal as are the guns and crew.  The man in the crows-nest is a resin casting.  The fore mast/crows nest and the guns are shown here part assembled.  The aft mast was very bent and so I will replace this with a plastic version using StripStyrene from Evergreen.

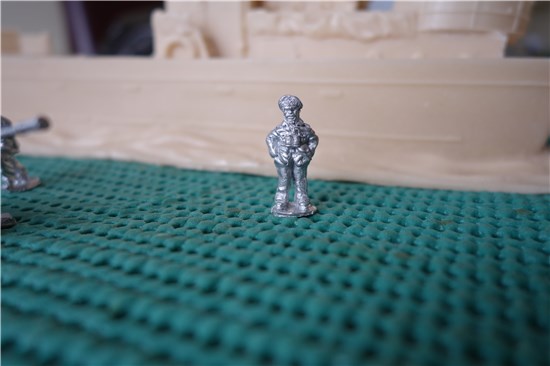
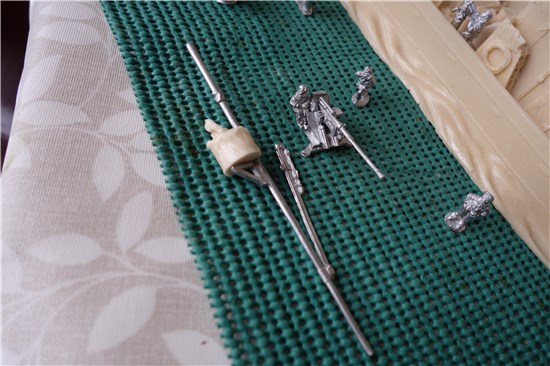
You can see (above left) that the captain is quite a little character whilst the guns are decent castings with very little flash.  The crew are in "action" poses.  There is also a junior officer for the bridge using a signalling lamp.

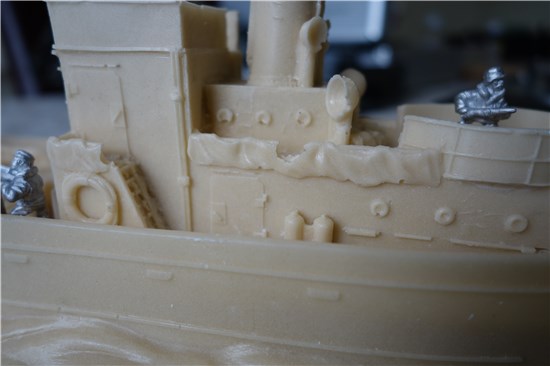
Some of the resin didn't travel/store well.  These missing pieces will have to be replaced with Milliput modelling putty.  The ventilation bells (not sure what they are calledindecision) will be replaced with cast parts from my local model shop which, luckily, stocks lots of ship bits.

This is certainly not going to be a quick project that I can knock out in a couple of evenings!!  Not only am I a ship novice, but there is a lot to do with this kit.  I have spent about 2 hours cleaning up and sanding the hull and superstructure already to get a decent fit and I reckon I have another evening of filling and sanding ahead of me.

Warning! If you are working with resin castings, please follow the basic rules;

     > wear a mask - the dust is nasty

     > wash your hands afterwards

     > wash the model in warm soapy water to remove mould greases

     > don't smoke around the model

Final push on vehicles

The end of May has seen a few spare days and the chance to finish painting and basing all the odds and bits that needed doing.  Apart from some wall sections (left), there are a number of motorcycles in the right foreground, artillery bases for 25pdr and 50mm AT guns (centre top and lower) and some new Austin 10 Utility cars ("Tilly"s) in the centre.

Here are the 8 figures selected to make up the Engineers Company for the German Pontoon Bridge.  Note the two figures up to their waists in water!!  The officer has his insignia painted on and I am really pleased with the outcome.  However, I won't be going back to do the existing officers in other formations!

Finally, a quick update on the German trawler.  I have decided to replace the damaged cowl ventilators with new cast plastic parts from Caldercraft and have also removed all of the moulded ladders and stairways.  The replacements are cut from plastic mouldings.  The aft mast is also shown, made from plastic tubing and replacing the bent original.  The hull has also had another couple of hour's worth of work removing excess resin.  Warning - resin is nasty stuff - always wear a mask and work in a ventilated area.

Going Up In The World

Its like giving birth!

Well alright - not really but the pressure and stress has been fantastic over the past couple of weeks as version 5 of FYOB has come closer to publication.

Checking, double-checking, reading and proof-reading, cross checking references and endless spell-checks have been undertaken to try to make v5 the best yet.  Not just in terms of playability but to remove some irritating typos that crept into v4 - despite the many checks!!

On the 7th August v5 was launched and I hope that the slight changes to the game play and the big change to the Order Dice rules will be well received.  To be honest, the new rules have been in use on my table for some time but I needed to make sure that I wasn't just changing things for changes sake.  The new rules had to be better - and I think that they are.

I'm working on a free pdf download for existing FYOB users that show these changes and that should be available on the website soon.

Norton goes to war

A tiny SHQ kit (actually a pair of kits) representing one of the contributions made to the war effort by the Norton motorcycle company.

This is the Norton motorcycle combo capable of moving 3 troops and a medium machine gun.  They appeared in recce formations and will do so again in my Operation Sealion games.

The men are not fully painted here and the vehicles need basing but they are fun to build (4 parts plus the men) and a pig to paint!!

Project CS

Plastic Soldier Kits make a British A9 cruiser which I wanted for my Operation Sealion games.  You get 3 in a box and they are an easy build with only about 12 parts.  The kits give you an option of the standard version (shown above left) or the desert version with a side skirt covering the rear of the tracks (to minimise sand/dust clouds).  You also get the option of building the turrets with a different mantel and a 95mm gun to represent the CS version of the tank.

Unfortunately, I wanted 3 of the normal versions and a CS version so the only option was to scratch-build a revised turret.

The result in shown above right.  The turret on the right is the one from the kit.  Using 40 thou plastic card and the original turret as a template, I cut out a set of turret sides, a base and a back plate.  Before fitting together, I used a sharp implement (a pointed centre marker) to create the rivets.

Lay the plastic card face down on a wooden surface and position the pointed device on the back where you want a rivet.  Tap sharply, but not too hard, with a light hammer.  Turn the plastic over and you will see that you have a pimple - a rivet - easy!!  Now just repeat for another 50 or 60 rivets that are needed for this turret!!!

The side vents are made from slivers of plastic strip and the turret ring is a penny fixed to the turret base with superglue.  The escape hatches on the top of the turret came from the scrap box.  The aerial base on the rear of the turret is a section of Plastistruct box section cut at an angle with something from the scrap box on top.  I think the "something" was an oil can or similar??  The turret join running laterally along the top of the turret is just a strip of plastic.  The open hatch and the commander came with the kit as an optional extra when building the tanks.  (I have 2 more for future use in the spares box now).  There is no location pin - the turret just sits on top of the chassis.

The final model is shown below.

New Equipment "Rolls" in

The "Rapid Fire" boys are linked with Ready To Roll models and the link from the RF website is worth following.

I recently ordered a few bits as part of the project to bring the US army up to scratch.  Here is the order as it arrived, well packed and complete as usual.

At the back are 4 M5 half-tracks and in front of them are a pair of M8 (37mm) armored cars (US spelling!) and a couple of 1 1/2 ton weapons tows.  In front are a pair of jeeps with drivers - separate heads for the drivers in whitemetal make this a VERY useful kit.  To the right are 2 Humber Light Recce cars which will end up in British service.

You can just about make out that the weapons tend to be whitemetal and separate from the resin body of the vehicle.  This requires a bit of careful work with the Superglue and the bodies themselves can have a little unwanted flash from the moulds but generally this is light and these kits should not be beyond the most average of modeller.

Remember to wear a mask when filing resins and always wash your hands/the model afterwards.

The Ready To Roll website has product pictures so if your resource library or the Internet fails to turn up a colour reference, the website can help.

This lot costs about £60 - about the same as you would pay for a small OO gauge locomotive for a railway layout and about half the cost of 12 wagons.  Good value when you consider the fun that can be had.

More pictures to follow when they have been through the paint shop.

New armour

Left above are the Italian AB41 armoured cars built for the Sicily games. Centre - a pair of SdKfz 231 (8 rad) cars - built from SHQ white-metal kits and very heavy!  Right are the Semovente L40 47/32 vehicles.  Italian armour was, on the whole, pretty rubbish but these self-propelled vehicles were a success.

All these models will need basing and a final coat of Games Workshop Purity Satin varnish (highly recommended) after the final painting details.

German pontoon bridging unit

This series of photos show the development of a German pontoon bridging unit based around the SHQ whitemetal pontoon bridge kit.  Top left shows the components of the SHQ kit and top centre shows plastic card copies of the bridging ramps.  The trailer (top right) is scratch-built using just a couple of sets of wheels from the scrap box.  Basic 40 thou sheet and various "Plastistruct" shapes are used to create the deck and stantions.  The canvas rolls were not used in the final scheme.  Bottom left shows how it looked after painting and bottom centre shows the loaded trailer and the SHQ kit together.  In order to satisfy the FYOB "Work & Tasks" rules, the bridging pieces had to be shown during construction.  Therefore, whilst the SHQ ramps are glued together, the plastic ramps are separate and removable from the trailer.


Site Map | Printable View | © 2008 - 2024 FightYourOwnBattles

Powered by mojoPortal | HTML 5 | CSS | Design by styleshout